Nos pompes de puisard et nos systèmes de secours de haute qualité peuvent protéger votre maison de manière fiable et vous permettre, ainsi qu'à votre famille, de rester en sécurité et au sec.
En savoir plusSystèmes et paquets
Accessoires et pièces détachées
Les pompes à eaux usées ou à broyeurs éloignent les eaux usées brutes et l'eau indésirable de la maison. Grâce à nos ensembles pré-plombés, il est facile de sélectionner et d'installer l'équipement adéquat.
En savoir plusSystèmes et paquets
Accessoires et pièces détachées
Stations de relevage des eaux usées
L'eau indésirable et les eaux usées brutes sont pompées vers un bassin extérieur. Les pompes des stations de relevage remontent et évacuent ces eaux usées.
En savoir plusPompes
Systèmes et paquets
Accessoires et pièces détachées
Pendant les tempêtes, l'excès d'eau peut entraîner des inondations, de la pollution et des dégâts. Nous proposons une gamme de pompes, de conteneurs et de commandes pour gérer efficacement vos eaux pluviales.
En savoir plusPompes
Systèmes et paquets
Accessoires et pièces détachées
Stations de relevage des effluents
Les stations de relevage des effluents collectent et pompent les eaux grises ou les effluents des installations commerciales ou des systèmes de traitement des eaux usées.
En savoir plusSystèmes et paquets
Accessoires et pièces détachées
En l'absence d'égouts sanitaires, des fosses septiques sont utilisées pour traiter les eaux usées avant leur élimination.
En savoir plusPompes
Systèmes et paquets
Accessoires et pièces détachées
Installez un drain d'évier n'importe où sans casser le béton. Utilisez nos pompes de vidange pour faciliter l'installation dans les zones dépourvues de drainage par gravité.
En savoir plusSystèmes et paquets
Accessoires et pièces détachées
Entraînements et contrôles pour les pompes Flint et Walling
En savoir plus
Accessoires et pièces détachées
Nos pompes antidéflagrantes pour effluents et eaux usées sont conformes à la classe 1, division 1, groupes C et D ou à la classe 1, zone 1, groupes IIA et IIB. Chaque pompe est immergée dans l'eau et testée en usine pour s'assurer qu'elle fonctionne comme prévu lorsque vous la recevez.
En savoir plusPompes
Systèmes et paquets
Accessoires et pièces détachées
Six Lateral Spider Valve® (valve araignée latérale)
- Serves 6 lateral lines in an septic system application
- A manifold that is configurable to your specific site conditions
- For sizing assistance, consult Product Support at 1-877-244-9340 or download the Spider Valve® Orifice Sizing Tool
- View More Details
The Spider Valve® assembly is designed to equally split septic effluent under pump pressure into 6 lateral lines. It will proportionally split flow to lateral lines of unequal length when a traditional distribution box cannot. It is ideal for drain field repairs or small building lots. The six lateral Spider Valve assembly includes 5/32” predrilled washers and a union for each washer. It should be installed within a 24-inch diameter riser for access to perform maintenance .
Product SKU:
5051-0034
UPC:
053514248994
1
year limited
warranty


1
year limited
warranty
;)
Have a question? Give us a call!
877-710-7867
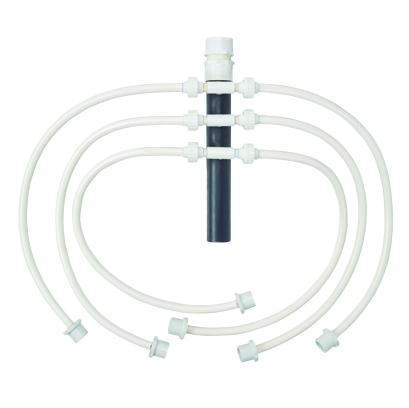
The Spider Valve® assembly is designed to equally split septic effluent under pump pressure into 6 lateral lines. It will proportionally split flow to lateral lines of unequal length when a traditional distribution box cannot. It is ideal for drain field repairs or small building lots. The six lateral Spider Valve assembly includes 5/32” predrilled washers and a union for each washer. It should be installed within a 24-inch diameter riser for access to perform maintenance .
Product Details
Our Spider Valve® assembly is designed to equally split septic effluent under pump pressure into six lateral lines. It is ideal for septic system applications with six lateral lines of unequal length. This often occurs with a home built on a small lot or when a replacement drain field is required. In such instances, a traditional distribution box is unable to split flow proportionally to lateral lines of unequal length. If that is the case, the Spider Valve is the answer.
Six lateral lines receive flow from the spider valve and then flow by gravity within the lines. Orifices within the manifold can be drilled to allow equal flow to each line. The six lateral Spider Valve assembly includes 5/32” predrilled washers and a union for each washer. Unions allow washers to be removed for cleaning and maintenance. A spider valve sizing program is available to calculate orifice size so that equal flow is obtained per line.
Features and Benefits
- Installs within a 24” diameter access riser buried flush-to-grade
- 3 feet of 1/2” diameter PVC flexible pipe on each discharge for ease of assembly
- 2” diameter SCH 80 PVC manifold with cleanout for equal pressurization and easy maintenance
- Pressurized splitting to a gravity disposal field
- 1-year limited warranty: this model comes with warranty coverage from Zoeller Pump Company, giving you extra protection and more peace of mind
Product Specifications
Shipping Weight:
5.5 kg
Shipping Dimensions:
Height 24 cm x Width 7 cm x Length 24 cm.
Literature
Technical Data
Sales and Marketing
Installation Instructions

Couleur 1
Couleur 2
Couleur 3
Couleur 4
Couleur 5